Retaining Wall Drainage: Preventing Costly Water Damage
Table of Contents
Water is the leading cause of retaining wall failure. Not because it touches the wall, but because it becomes trapped behind it. When groundwater has nowhere to go, pressure builds against the structure, stressing materials that were never designed to resist constant saturation and outward force.
Retaining wall drainage systems control that pressure by intercepting water before it accumulates in the backfill soil. Without proper drainage, even a well-built wall can crack, shift, or fail prematurely.
This guide explains how retaining wall drainage works, why improper water management can lead to costly structural damage, and how to identify conditions that require corrective action before failure.
Why Retaining Walls Fail Without Proper Drainage
Hydrostatic pressure is the force water exerts against your retaining wall when it accumulates in the backfill soil. As water saturates the ground, it pushes outward with increasing intensity against the wall’s surface.
Physics works against you in two ways:
- Saturated soil weighs significantly more than dry soil, increasing the lateral load pushing against the structure
- During heavy rain events, this pressure can double as water fills every void in the backfill material
Your wall absorbs sustained stress with no opportunity for relief, and over time, cracks propagate through the concrete.
Without intervention, continuous pressure weakens structural integrity at an accelerating rate:
- Rebar corrodes when water penetrates through cracks
- Mortar joints deteriorate and lose bonding strength
- A wall that seemed stable for years can reach a tipping point where damage becomes visible almost overnight
Warning Signs You Should Never Ignore
Your retaining wall communicates distress through predictable patterns. Recognizing these indicators early prevents catastrophic failure:
- Horizontal cracking along mortar joints, often with visible water staining or active seepage during rain
- Bulging or bowing sections where the wall curves outward under pressure
- Leaning at the top, indicating foundation movement or soil erosion beneath the footing
- Efflorescence (white mineral deposits) on the wall face, confirming water migration through the concrete
- Sinkholes or depressions forming in the soil behind the wall
Components of an Effective Drainage System
Proper retaining wall drainage requires multiple elements working together. Each component serves a specific function, and omitting any one creates vulnerability that water will eventually exploit. This approach functions similarly to a French drain system, using gravel and perforated pipe to intercept and redirect groundwater before it causes damage.
Perforated Drain Pipes and Gravel Backfill
The foundation of any drainage system is a perforated drain pipe installed at the base of your wall. This pipe collects water before it builds pressure against the structure and channels it to a safe discharge point.
Position the pipe in a trench along the wall’s foundation, surrounded by a minimum of 12 inches of clean, angular gravel on all sides. Angular gravel creates void spaces between particles that allow water to flow freely toward the pipe. Rounded gravel compacts over time and restricts drainage, defeating the purpose of the backfill layer.
The pipe must slope at a minimum 0.5% gradient toward daylight outlets or storm drain connections to prevent sediment accumulation in the perforations.
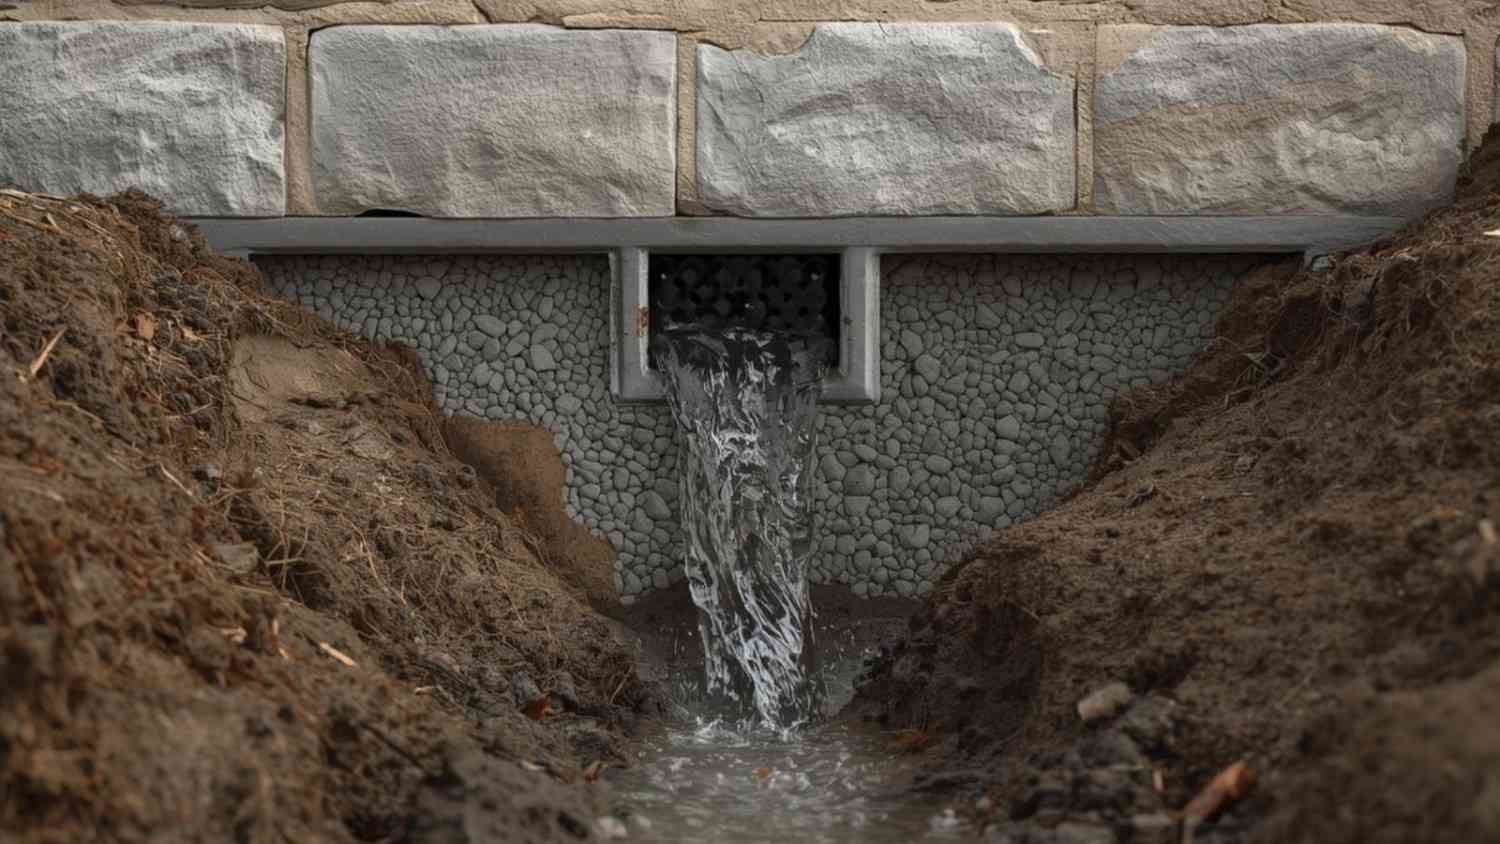
Weep Holes and Filter Fabric Protection
Weep holes are small openings in the wall face that allow water to escape before pressure builds. They work with the drain pipe to provide multiple exit points for accumulated moisture.
Install weep holes every 4 to 8 feet along the lower courses of the wall. Spacing depends on your soil conditions and expected water volume, with closer spacing in areas that receive heavy runoff or have poor-draining clay soils. Each opening requires protection with filter fabric to prevent soil particles from washing through.
Geotextile wraps encapsulate the entire drainage assembly, separating the gravel zone from the surrounding native soil while allowing water to pass freely. This fabric barrier prevents fine particles from migrating into the drainage zone over time.
Proper Installation Methods
Premium drainage materials fail when installed incorrectly. The sequence, technique, and attention to detail during assembly determine long-term performance.
Excavation and Pipe Placement
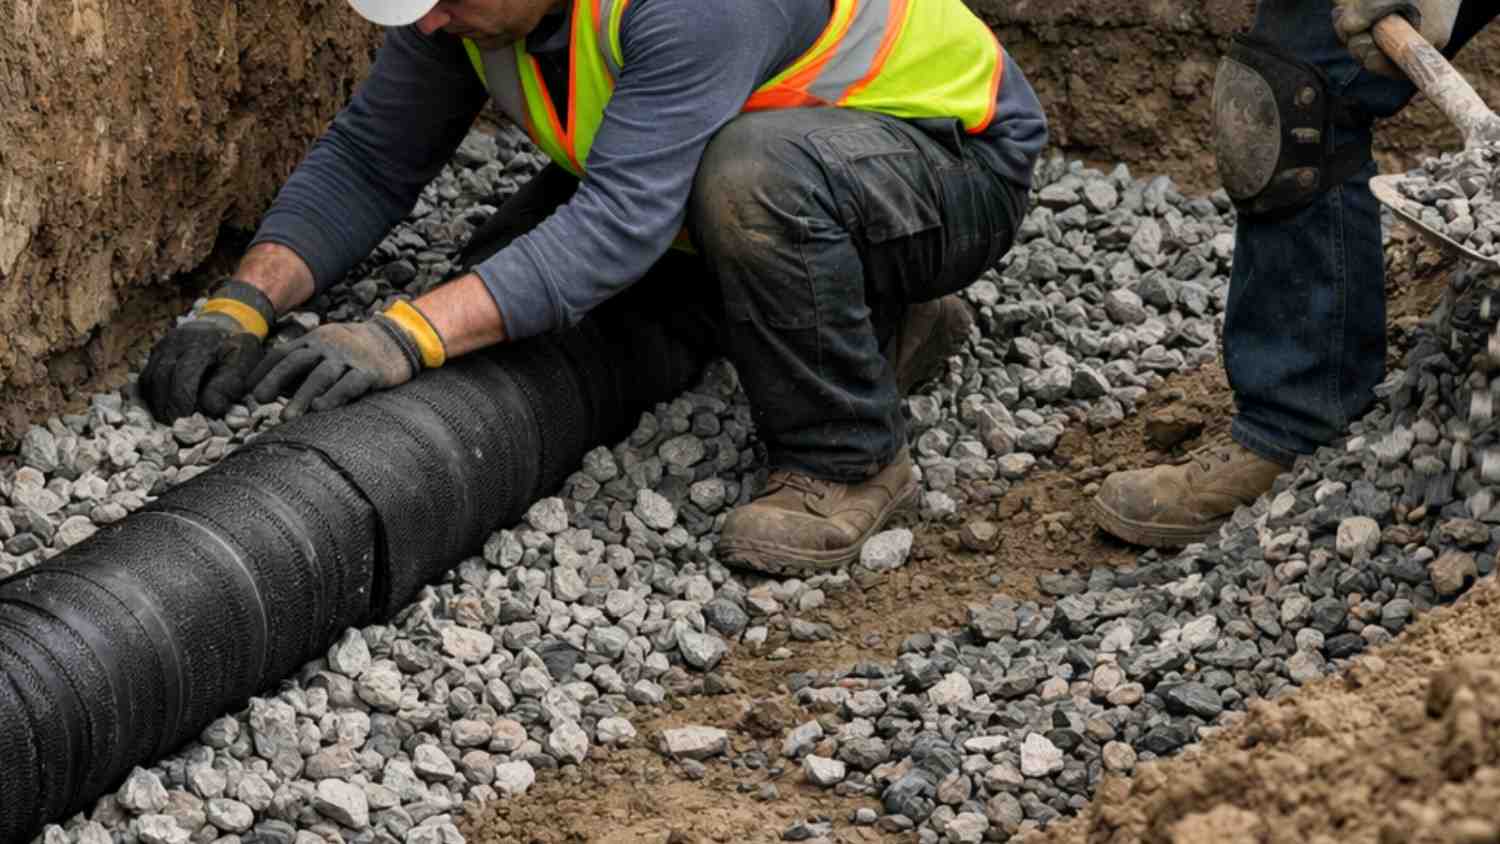
Start by excavating along the wall base to accommodate the pipe diameter plus the gravel envelope surrounding it. Create a gravel bedding layer before pipe placement, then level the base material carefully to maintain a consistent slope throughout the run. An uneven bedding creates low spots where water pools.
Lay perforated pipe sections with holes facing downward. This orientation allows water to rise into the pipe rather than permitting sediment to settle directly into the perforations. Connect sections securely using approved fittings, wrapping the assembly in geotextile fabric before surrounding it with gravel.
Add gravel in layers around and above the pipe, then backfill the remaining space with soil in compacted lifts. Each lift should be no more than 6 to 8 inches deep before compaction. Loose backfill settles unevenly over time, creating voids that channel water directly to the wall surface.
Site Grading and System Integration
Drainage performance extends beyond the immediate wall area. You must direct surface water away from the structure before it enters the ground and causes soil saturation in the backfill zone.
Grade the surrounding soil to slope away from the wall at a minimum 5% gradient. This slope prevents surface runoff from concentrating at the wall location and overwhelming the subsurface drainage system. Flat or reverse-graded areas pond water against the wall, negating even well-designed pipe-and-gravel installations.
Your retaining wall drainage should connect to a site-wide waterproofing strategy that accounts for roof runoff patterns, landscape grading, gutter discharge locations, and soil composition. Treating the wall in isolation ignores contributing factors that will undermine even properly installed drainage.
Maintaining Your Drainage System
Properly installed drainage systems can deteriorate over time. Tree roots penetrate pipes. Ground movement shifts pipe alignment. Seasonal inspection catches these problems before they become structural emergencies.
Schedule inspections at the start and end of the rainy season. Clear debris from weep holes and drainage outlets before heavy rains arrive. Test the flow by running water at the top of the backfill area and confirm it exits through the weep holes and the pipe outlet within a reasonable time. If water appears on the wall face instead, your system has failed.
Document the condition of your wall with photographs at each inspection. Comparing images over time reveals gradual changes that are difficult to notice day to day but become obvious when viewed sequentially.
The True Cost of Drainage Failure
Drainage system installation accounts for only a fraction of the cost of structural repair after failure. Understanding the full financial impact of a failed drainage system helps you make informed decisions about prevention.
Wall Reconstruction Costs
Retaining wall repair costs in Los Angeles vary based on damage severity, wall type, and accessibility. Minor crack repairs might cost a few hundred dollars, but once structural integrity is compromised, you face partial or complete wall reconstruction. A moderately damaged 50-foot wall requiring significant repairs can cost several thousand dollars. Complete failure requiring demolition and rebuilding multiplies that figure by a factor of 10 or more.
Secondary Damage Expenses
Wall repair costs from water damage represent only the beginning. Failed drainage creates a cascade of related damage, each with its own price tag:
Soil erosion remediation becomes necessary when backfill washes away, leaving voids that destabilize the wall foundation and surrounding landscape. Restoring proper grading and replacing lost soil significantly increases your total project cost.
Foundation damage occurs when water migrating from a failed retaining wall reaches your home’s foundation. Repairing foundation cracks, waterproofing basement walls, and addressing structural movement can cost as much as the wall repair itself.
Mold remediation is required when persistent moisture leads to contamination in your home. Basements and crawl spaces adjacent to failing retaining walls often develop mold growth that requires professional remediation, air quality testing, and, in some cases, the removal of affected building materials.
The total cost of reactive repairs after failure is typically 5 to 10 times higher than the cost of proactive drainage installation.
Insurance Limitations
Many homeowners assume their insurance will cover damage to retaining walls. Most policies exclude damage from earth movement, poor maintenance, or inadequate original construction. Proactive drainage installation eliminates this coverage uncertainty by preventing damage before it occurs.
Frequently Asked Questions
Can I add drainage to an existing retaining wall?
Yes, though the process requires careful excavation to avoid destabilizing the existing structure. A professional assessment determines the safest approach based on wall construction, soil conditions, and current damage level. In some cases, installing drainage during reconstruction proves more cost-effective than retrofitting a damaged wall.
What causes retaining wall drainage to fail over time?
Common failure causes include sediment accumulation that clogs pipes and filter fabric, tree root intrusion that blocks or crushes pipes, ground settlement that disrupts pipe slope, and deterioration of drainage materials.
Let Us Solve Your Retaining Wall Drainage Problems
Patching cracks without relieving the pressure behind your retaining wall will lead to repeat failures. True repairs address the source of the water pressure, not just the visible damage. That is why retaining wall problems should be handled by experienced water intrusion specialists.
Our Building Envelope Investigation Process
We examine how water moves through your property and identify all pathways contributing to moisture accumulation. Our water leak detection capabilities include non-invasive moisture assessment that maps water movement without destructive investigation. We determine the extent of saturation behind your wall, identify the sources feeding that moisture, and design solutions that address every contributing factor.
Our Guarantee to You
We deliver accountability through a single expert team. We repair drainage failures, verify function through testing, and guarantee results. You receive documentation confirming your system performs correctly, not verbal assurances that work was completed.
Our verification testing runs water through the system and measures discharge at outlets, confirming flow rates meet design specifications and that no water appears at locations indicating system bypass. This testing occurs before we consider any project complete.
If your retaining wall shows signs of drainage failure or if you want to prevent problems before they start, contact our team for an assessment.
About the Author
 Cameron Figgins
Cameron Figgins is the founder of Absolute Maintenance & Consulting. With over 30 years of hands-on industry experience, he specializes in identifying complex water intrusion issues in Southern California homes and is dedicated to helping homeowners protect their property with the latest in detection technology.”